Self-hosted Ngrok
Published at March 23, 2020 · 7 min read
Share on:To the great credit of the Ngrok author, people on the Internet use the term Ngrok to suggest a tooling need - Application Tunneling. Packetriot provides managed service but we also build and publish Spokes, our self-managed server.
So… Spokes is really a self-hosted Packetriot :)
We’ve written Spokes to give users the ability to deploy and manage your own Application Tunneling service. It provides all the features of our managed edge-server but without our business or metering logic. It can be used for personal or commercial use. Commercial uses include managing fleets of tunnels for IoT devices or for supporting a business.
The Packetriot client works identically with Spokes as you’d imagine, so all of our client documentation, tutorials and tips can be applied.
We have detailed documentation on how to setup Spokes here so consider this a speed-run through it to demonstrate what it takes to quickly and easily it set it up.
Requirements
You’ll need a few things before we start:
- Packetriot account with a payment method
- Spokes license for personal use $49/yr
- Internet accessible server (CentOS 7.6+): DO, AWS, Linode $5/mo
- A custom domain name: Namecheap, Google Domains $10-12/yr
When it comes to virtualized servers and domains there are so many alternatives out there. Any of the providers I listed are just examples, please use your favorites. Spokes is built to run on CentOS 7.x so please choose that as the Linux distribution for it.
We provide RPMs as our installation method of choice. If you need another method please let us and we’ll begin broadening our packaging.
Installation
Download the latest version of Spokes to your server.
[user@host] curl https://pktriot-dl-bucket.sfo2.digitaloceanspaces.com/releases/linux/spokes-0.9.11-1.x86_64.rpm -o spokes-0.9.11-1.x86_64.rpm

[user@host] sudo rpm -Uvh spokes-0.9.11-1.x86_64.rpm
Domain Setup
This is an important. We have to setup DNS records for the server we are running Spokes on. Spokes uses Let’s Encrypt to create and maintain TLS certificates. It will automatically maintain the certificates as well. No need to download and install certbot, create a cronjob, etc… to enjoy HTTPS.
This tutorial assume your domain is example.com. It’s unlikely you want to address your Spokes server with this domain, so we’ll use a subdomain called spokes.example.com.
Create an A record with your domain registrar such that the IP of the server is the value for this A record. Tip, if you’re not an advanced user I would initially set the TTL to a low value (60) until you have everything working. Later I would change it to something more typical like 1800 or higher.
In addition, let’s create a wildcard record. This will be a CNAME and it’ll be useful because you may want to create tunnels and dynamically choose a hostname that you want to just work without any additional DNS record management. To do this create a CNAME for *.spokes.example.com whose value will be spokes.example.com.
Below is a table summarizing the records we need.
| Record | Type | Value | TTL |
|---|---|---|---|
| spokes | A | 1.2.3.4 | 1800 |
| *.spokes | CNAME | spokes.example.com | 1800 |
Alright, we’re done with domains.
Configuration
We need to update the Spokes configuration. This requires us to change only two values: the license key token and the hostname for our server. The Spokes package provides a template for the configuration /etc/spokes/config.json.example. You’ll want to change to the spokes system user to make these edits.
[user@host] sudo su spokes

[spokes@host] cp /etc/spokes/config.json.example /etc/spokes/config.json
Your license token can be found here after you purchase it. Note, you’ll need a payment method added to your account to purchase a personal or commercial-use license.
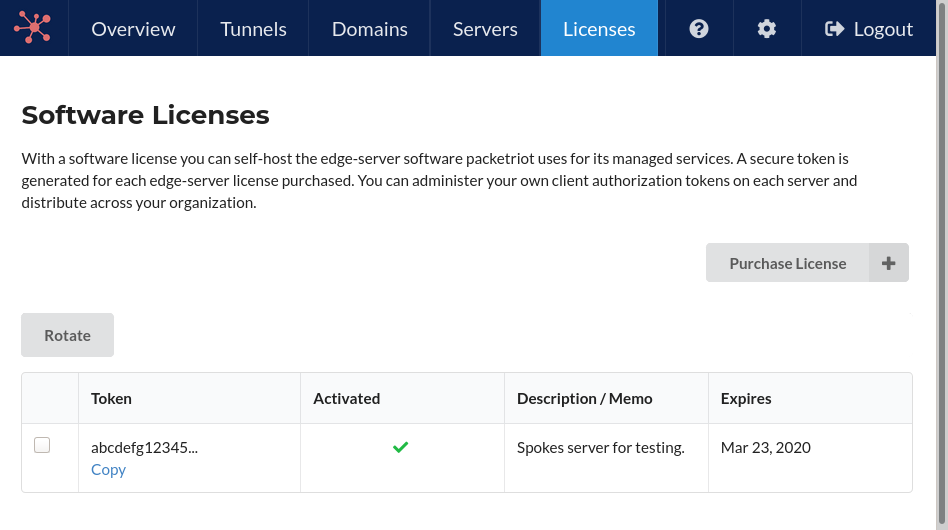
Spokes Licenses.
Now using your favorite editor let’s make the changes. Here’s an example using our values. Note, remember to input your license auth token :)
{
    "domain": "spokes.example.com",
    "dataPath": "/var/lib/spokes",
    "database": {
        "path": "/var/lib/spokes/spokes.db"
    },
    "token": "REPLACE WITH LICENSE AUTH TOKEN",
    "portRange": {
        "begin": 22000,
        "end": 22999
    },
    "tunOptions": {
        "maxPoolSize": 10,
        "maxPorts": 20
    }
}
You’ll see the block tunOptions and may be wondering what it’s for. Check out the details here. We ship the defaults with lots of ports per tunnel and more data-channels then we use on our managed servers (1-5). Our documentation has more guidance.
Also, the portRange block is interesting too. This is the range of ports that Spokes will allocate from and assign to tunnels (clients). Please check out this section for more information.
Start the Spokes Service
Once these two changes to the configuration file are completed you can start the service using systemctl. Spokes uses Let’s Encrypt to generate a TLS certificate for HTTPS support, so it’s important that a domain and DNS records have been setup correctly.
If you perform steps out of order or input incorrect values in your DNS record expect to wait out the TTL on those records before Let’s Encrypt generates the certificate.
To start the service run the following command:
[user@host] sudo systemctl start spokes
You can monitor the service by using the journalctl command.
[user@host] journalctl -u spokes -f -n 100
Spokes Tokens
Spokes offers two mechanisms to help establish client tunnels: registration tokens and authentication tokens. An authentication is just a pre-generate token you would give to a user to configure their tunenl.
A registration token is one that enables you to generate an authentcation token. It’s more flexible and great for dealing with a fleet of devices (IoT) or users.
Here’s some example steps for generating an authentication token and then configuring with the Packetriot client.
Generate authentication token on Spokes server:
[user@spokes-host] spokes token create --hostname tun-01.spokes.example.com
Client auth-token:
c6e15c70e9a6504dd1fe036d23b...
Noticed use the flag --hostname to give the tunnel associated to the token a hostname. These hostnames are not functional in Spokes but it can be useful to use hostnames that help you identify and manage the tunnels.
Back to our example… since we setup a wildcard domain, tun-01.spokes.example.com will resolve to spokes.example.com and we can use the hostname to more easily manage the token with the Spokes CLI tool.
Configure Packetriot client with authentication token:
[user@host] pktriot --config spokes-docs.json unmanaged configure --hostname spokes.example.com --key c6e15c70e9a6504dd1fe036d23b...
The unmanaged configure command requires the --hostname flag and must be the domain name you chose for your server. This is how the client knows which server on the Internet to connect to. In our case it will spokes.example.com.
Pro-Tip - Always Use Registration Tokens
I would almost always use registration tokens. They are built for more automation and less information needs to be communicated between the Spokes administrator and users. The admin can generate several registration tokens and invalid them when necessary.
We didn’t use them here since this is a quick run-through but our Spokes docs has all of the details and use-cases described there.
Users can specify a hostname for their tunnel when they configure it with a registration token. Here’s an example:
[user@host] pktriot --config spokes-docs.json unmanaged configure --hostname spokes.example.com \
	--tunnel-hostname dev-tun-v123.spokes.example.com \
	--registration <token>
Packetriot Client Examples
Your Spokes server is fully configured and setup. There’s pretty much no maintenance from this point on apart from upgrading to the latest version of Spokes as we release them.
Our Packetriot client was configured with the authentication token created on the Spokes server, so let’s create a few rules.
Quick reminder, rules don’t take affect without restarting the client. After any changes just restart the client.
Open TCP Port to Access Local SSH server
[user#host] pktriot tunnel tcp forward --destination 127.0.0.1 --dstport 22
Allocated port 22892 to forward traffic

TCP traffic rule added
Serve HTTPS Traffic to Local App
Let’s say we want to share our NodeJS application that’s listening on port 3000. We’ll enable Let’s Encrypt on our node app too. Note, it takes a bit (20-30 seconds) to initialize TLS certificates the first time…
[user@host] pktriot tunnel http add --domain nodejs-app.spokes.example.com \
	--letsencrypt \
	--destination 127.0.0.1 --http 3000
Serve HTTPS Traffic Upstream & Static Assets
Modern web apps include an upstream and static assets. The Packetriot client can serve, unlike some other services. Here’s an example of our NodeJS app but with a static assets directory too.
[user@host] pktriot tunnel http add --domain nodejs-app.spokes.example.com \
	--letsencrypt \
	--webroot $PWD/assets \
	--destination 127.0.0.1 --http 3000
Serve a Local Directory
Let’s password protect the current working directory and we’ll use Let’s Encrypt as well.
[user@host] pktriot tunnel http add --domain files.spokes.example.com \
	--letsencrypt --webroot $PWD \
	--password

Input password for session-based authorized traffic
Password:

HTTP/S traffic rule added
[user@host]
Conclusion
Hope this was tutorial was helpful. A lot people ask many forums how they can host their Ngrok. Many tutorials require several applications to be installed, then maintained, and because there is a lot of different kinds of network and server administration being performed, it can be confusing.
I hope you found that setting Spokes is not that complicated and we have plenty of documentation and support to help with your question.
We like friends :) Follow us Twitter
Cheers!