Setup Packetriot using Docker on Linux/Unix
Published at August 3, 2019 · 9 min read
Share on:Docker makes deploying applications and services extremely easy. With all of the assets, executables and runtime that an application requires in the container image, you no longer need to worry about dependencies.
In addition, since Docker allows you mount paths from your hosts’ file-system inside a container, you can move a container easily between computers or upgrade to newer images.
Docker makes deploying applications easy.
In many of our tutorials we use Docker to deploy applications because the setup is extremely easy and we can spend more time discussing how to setup your tunnel to support that service. In this tutorial, we’ll discuss how to deploy the Packetriot client software using Docker.
We’ll be focusing on Linux, macOS or other Unix-like operating systems in this tutorial. Some of steps will be identical if you’re running Windows, but we’ll be covering Packetriot + Docker for Windows in a separate tutorial.
Let’s start!
Installation
Like all container images, you just need to pull the latest images from Docker Hub.
docker pull packetriot/pktriot:latest
Configure a Tunnel
When I setup a new tunnel using the Docker image, I like prefer to create a directory just for this tunnel in a location on my file-system where the user that maintains the tunnel has access too.
This point may seem obvious, but I make it since the pktriot client able is host static websites on its own. Its common to want to quickly share something and just move or copy file(s) to a location on your file-system that will be served up by a tunnel. This is easier when the paths accessible and writable to you.
With the steps below we’ll create a new sub-directory in our users’ home called Tunnels. We’ll create a sub-directory for our tunnels’ configuration and any static content we want to host.
[user@host] cd $HOME
[user@host] mkdir Tunnels
[user@host] cd Tunnels

# let's make a sub-directory for our tunnel
[user@host:~/Tunnels] mkdir demo-tunnel
Next, we’ll pull down the latest pktriot Docker image and create a new unconfigure container. Once the container is running, we’ll configure it and restart the tunnel.
It’s important note when using the container to deploy and maintain a Packetriot tunnel, that it will need to be restarted between changes. Changes made to the configuration are not realized dynamically by the tunnel.
When we configure the container, it’s an interactive operation. It’s very important to use the -it flag when we invoke docker exec. Using the /data as the root directory for our configuration is mandatory when using the container with its default entrypoint.
[user@host:~/Tunnels] docker pull packetriot/pktriot:latest

# create a new container
[user@host:~/Tunnels] docker run -d --restart always -v $PWD/demo-tunnel:/data --name demo-tunnel packetriot/pktriot:latest

# Notes:
# 1) configure the container, the -it flag is extremely important
# 2) select [2] in the path to the configuration

[user@host:~/Tunnels] docker exec -it demo-tunnel pktriot configure
Choose a path to the configuration file:
[1] /etc/pktriot/config.json
[2] /data/config.json
[3] /root/.pktriot/config.json

Input selection [#]: 2

Authenticate this client by visiting this URL:
https://packetriot.com/client/identauth/4e61e6c1c40c236c57...
Visit the authentication URL and login with your credentials. This will generate a token that your tunnel will use for authenticating and identifying itself.
Next, choose the region of your server and then this will complete the process of configuring your tunnel.
Identified and authenticated!

Choose the region for the edge server to connect to:
+------------------------+
| #   | Region           |
+------------------------+
| 1   | us-east          |
+------------------------+
| 2   | us-west          |
+------------------------+
| 3   | eu-central       |
+------------------------+
| 4   | asia-southeast   |
+------------------------+

Input selection [#]: 1

# give the tunnel a name, note, -it isn't used because this isn't
# an interactive operation
[user@host:~/Tunnels] docker exec demo-tunnel pktriot edit --name demo-tunnel
tunnel updated!
We need to restart the tunnel. The configuration was changed and restarts are necessary between configuration changes.
Once the tunnel has been restarted we can use the pktriot info command to get the information about our tunnel such as the hostname it was assigned and the detailed information on the server it connects to.
[user@host:~/Tunnels] docker restart demo-tunnel

# print the info
[user@host:~/Tunnels] docker exec demo-tunnel pktriot info
Client:
	Hostname: damp-water-68304.pktriot.net
	Server: us-east-65319.packetriot.net
	IP: 159.203.126.35

# print the logs
[user@host:~/Tunnels] docker logs demo-tunnel
Connecting...

Running HTTP services:
+------------------------------------------------------------------------------------------------+
| Domain                           | Destination   | HTTP   | Secure   | TLS   | Document Root   |
+------------------------------------------------------------------------------------------------+
| damp-water-68304.pktriot.net     |               | 0      | true     | 0     | --              |
+------------------------------------------------------------------------------------------------+
When there are no traffic rules the pktriot client will create one to let you access and test that the tunnel is working with HTTP/S. In our case we’ll visit https://damp-water-68304.pktriot.net in a browser.
Note, there are no warnings when we visit the HTTPS site. This is because the hostname matches the rules of the wildcard cert used *.pktriot.net. Further down this tutorial we will create subdomains with the hostname we were assigned and this will create browser warnings.
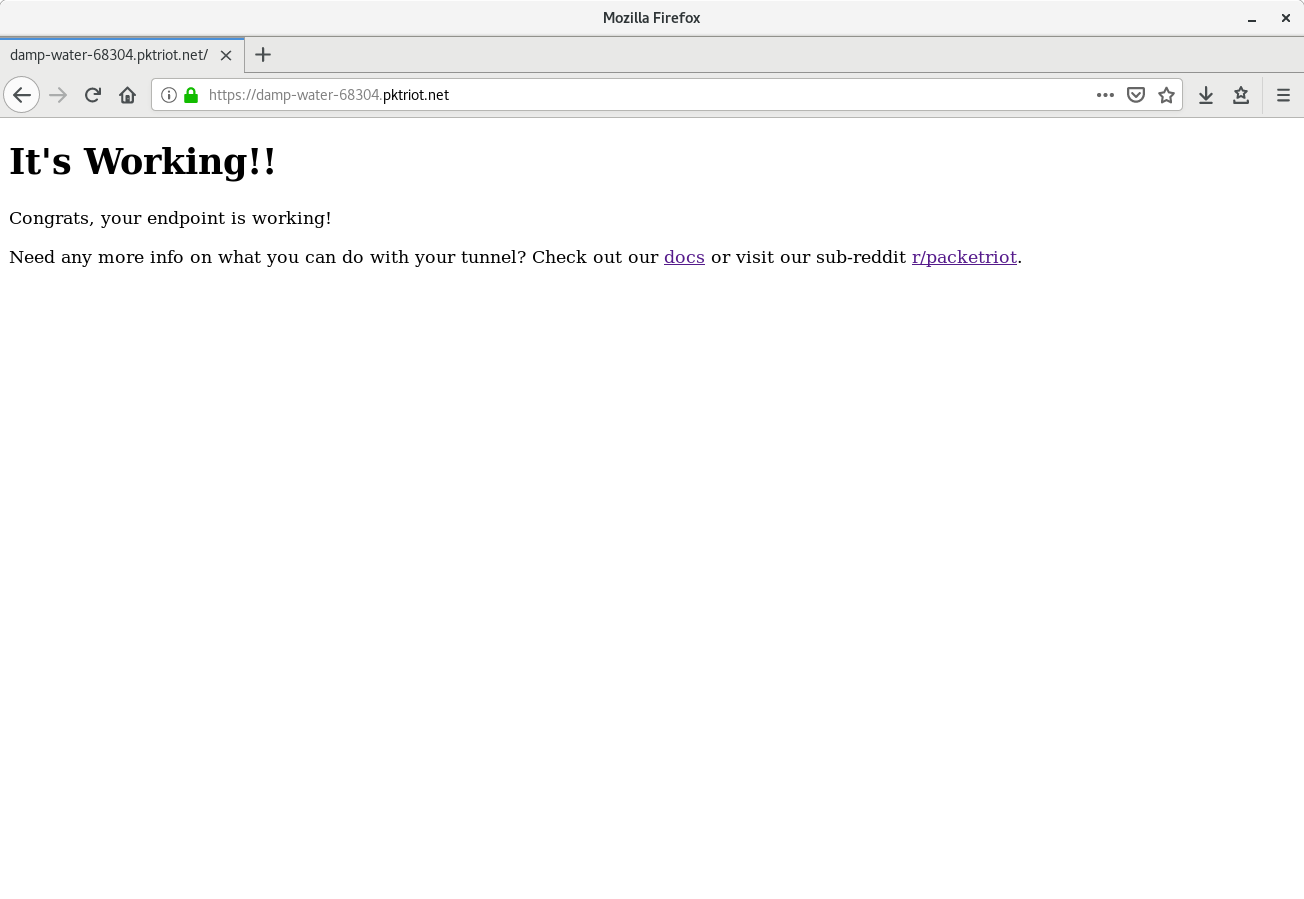
Confirm tunnel configuration.
Let’s move onto making some simple traffic rules to see how we can work with our tunnel running inside a Docker container.
Setup Traffic Rules
In this tutorial we’re going to setup rules to serve static content for different websites. Traffic rules that forward to upstream servers don’t include any caveats when the tunnel is deployed using a container. However, static content does includes some caveats so and we cover those below.
Create the Static Sites
Let’s create two static sites, one for hosting files that are publicly available to the Internet and another for hosting a blog that is generated using a static site-generator like Hugo.
We’re going to change into the tunnel directory and create two sub-directories for these different sites. The steps I’ll be listing are using conventions that hopefully makes organization of tunnel-related data simple to follow.
# change to the tunnel dir
[user@host:~/Tunnels] cd demo-tunnel

# create the files directory
[user@host:~/Tunnels/demo-tunnel] mkdir files

# create some sub-directories in the files so we'll have something to navigate later
[user@host:~/Tunnels/demo-tunnel] mkdir files/archives
[user@host:~/Tunnels/demo-tunnel] mkdir files/images
[user@host:~/Tunnels/demo-tunnel] mkdir files/dotfiles
For our blog built using Hugo, we’ll just assume that it’s installed and you’ve configured a basic hello world site using the tutorial. We’ll show the basic steps and wave our hands over the details.
# change to the tunnel dir
[user@host:~/Tunnels] cd demo-tunnel

# use hugo to create a new site, we're using a subdomain from the hostname
# that was assigned to our tunnel.
[user@host:~/Tunnels/demo-tunnel] hugo new site blog

# setup the blog
[user@host:~/Tunnels/demo-tunnel] cd blog

# download and setup a hugo theme
[user@host:~/Tunnels/demo-tunnel/blog] git clone https://github.com/budparr/gohugo-theme-ananke.git themes/ananke

[user@host:~/Tunnels/demo-tunnel/blog] echo 'theme = "ananke"' >> config.toml

# create an empty post
[user@host:~/Tunnels/demo-tunnel/blog] hugo new posts/hello-world.md

# generate the site, the output is in the public sub-directory
[user@host:~/Tunnels/demo-tunnel/blog] hugo -D
Using a static site generator like Hugo may be overkill for this tutorial but it’s very popular so I think using it here is valuable. It’s more complicated then just creating a simple index.html in a directory and demonstrates how you might want to organize static data that will be served by the tunnel inside the container.
We’re ready to create some rules and begin serving this content.
Create Rules
The rule creation is going to be very simple. We only need two rules for these sites, and we’ll be using subdomains from the hostname that was assigned to this tunnel.
What’s very important to note is that we will be using directories from the scope of the pktriot tunnel running inside the container and not the scope of the host computer.
After we add the rules we need to restart the container for the tunnel to realize them.
# rule for public files serving
[user@host:~/Tunnels/demo-tunnel] docker exec demo-tunnel pktriot tunnel http add --domain files.damp-water-68304.pktriot.net --webroot /data/files

# rule for serving out hugo-powered blog, not the path is to the "public" sub-directory
[user@host:~/Tunnels/demo-tunnel] docker exec demo-tunnel pktriot tunnel http add --domain blog.damp-water-68304.pktriot.net --webroot /data/blog/public

# restart the tunnel
[user@host:~/Tunnels/demo-tunnel] docker restart demo-tunnel

# print the summary
[user@host:~/Tunnels/demo-tunnel] docker exec demo-tunnel pktriot info
Client:
	Hostname: damp-water-68304.pktriot.net
	Server: us-east-63815.packetriot.net
	IP: 138.197.66.62

HTTP services:
+--------------------------------------------------------------------------------------------------------+
| Domain                               | Destination   | HTTP   | Secure   | TLS   | Document Root       |
+--------------------------------------------------------------------------------------------------------+
| files.damp-water-68304.pktriot.net   |               | 80     | true     | 443   | /data/files         |
+--------------------------------------------------------------------------------------------------------+
| blog.damp-water-68304.pktriot.net    |               | 80     | true     | 443   | /data/blog/public   |
+--------------------------------------------------------------------------------------------------------+
Visit the sites using HTTP or HTTPS. You will get browser warnings when you visit the HTTPS site, this is because the wildcard certificate for *.pktriot.net is setup for one level of subdomain.
This means that https://damp-water-68304.pktriot.net will not generate any warnings but https://blog.damp-water-68304.pktriot.net will, because this hostname has two levels. This limitation is due because we don’t want to generate too much traffic and demand to Let’s Encrypt for subdomain wildcard certs.
However, if you own a custom domain, you can use that and avoid the inconvenience.
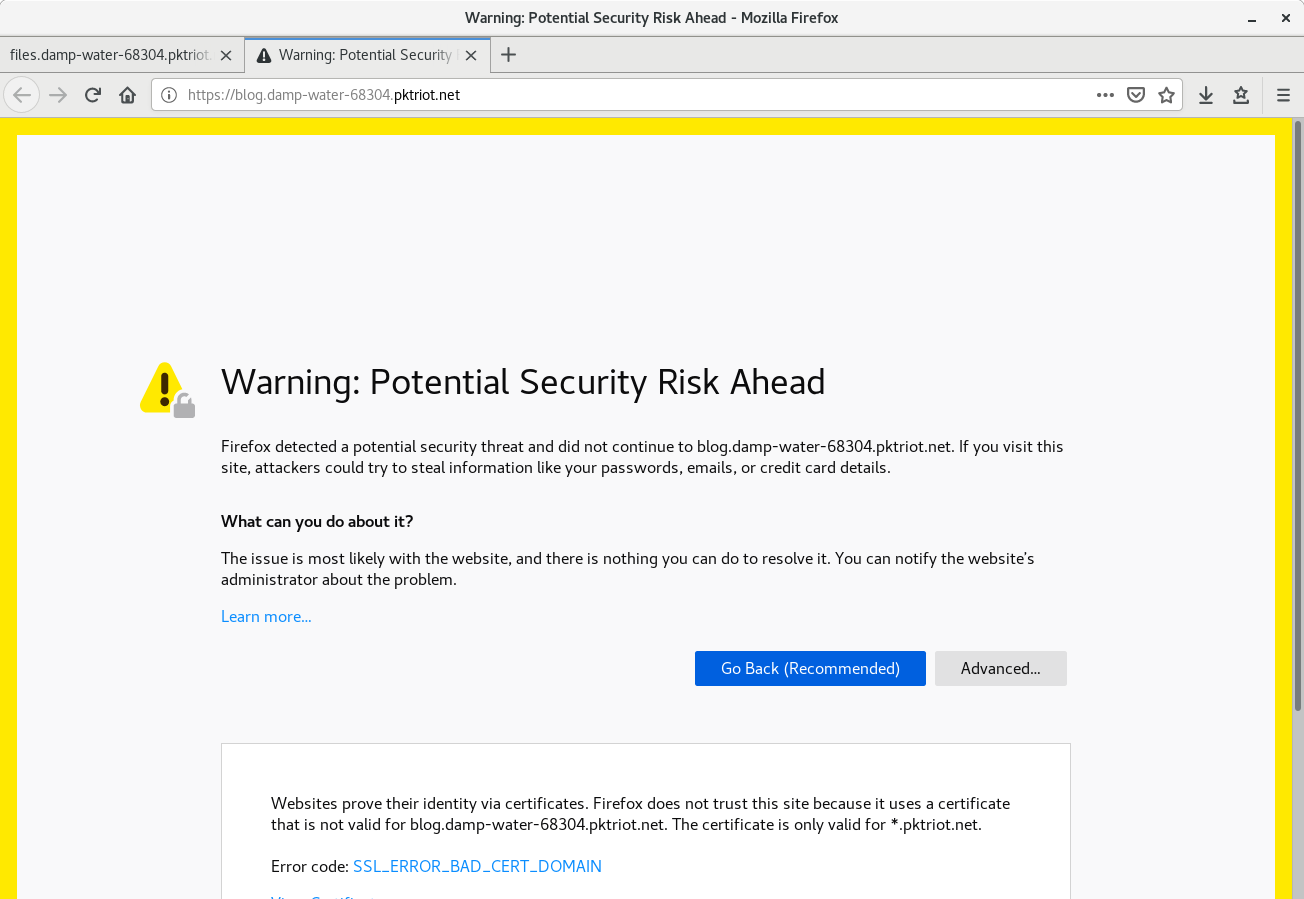
Security warning expected.
Clicking forward, you will visit the blog generated by Hugo. Visiting the files.damp-water-68304.pktriot.net in your browser will provide you with a directory listing showing the directories we created earlier: archives, images, dotfiles.
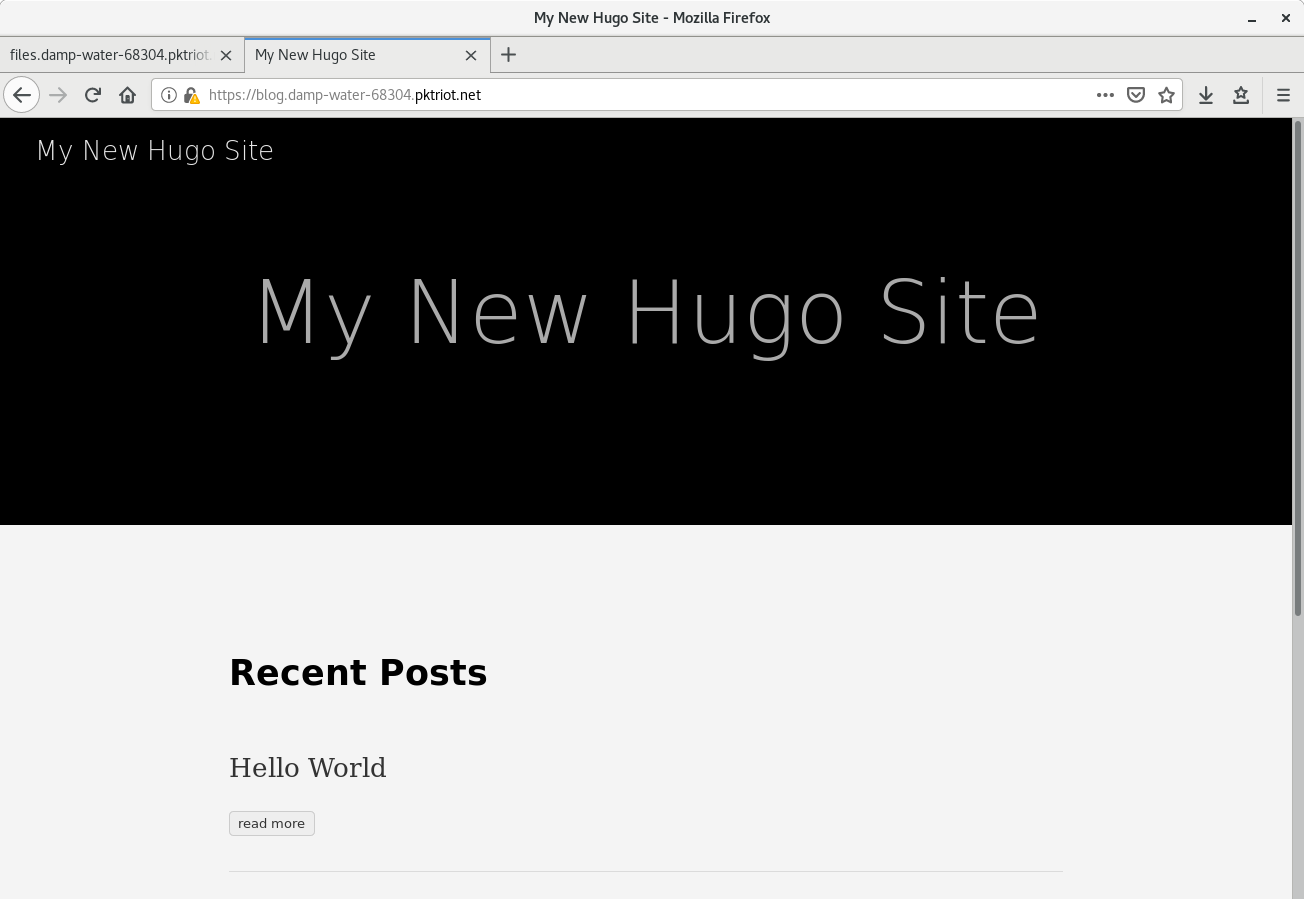
Static blog site.
Updating to Newer Images
Let’s discuss how we upgrade to new container images. Since we have a directory demo-tunnel that includes our config.json and static site content, we can just remove the existing container, pull down any updates and then create the container using the same command we did before.
Below is a summary of the steps.
# starting in our main tunnels directory
[user@host:~/Tunnels] docker stop demo-tunnel
[user@host:~/Tunnels] docker rm demo-tunnel

# pull down any updates
[user@host:~/Tunnels] docker pull packetriot/pktriot:latest
...

# recreate using the same command, not need to configure or do anything else
[user@host:~/Tunnels] docker run -d --restart always -v $PWD/demo-tunnel:/data --name demo-tunnel packetriot/pktriot:latest

# print the summary
[user@host:~/Tunnels] docker exec demo-tunnel pktriot info
Client:
	Hostname: damp-water-68304.pktriot.net
	Server: us-east-63815.packetriot.net
	IP: 138.197.66.62

HTTP services:
+--------------------------------------------------------------------------------------------------------+
| Domain                               | Destination   | HTTP   | Secure   | TLS   | Document Root       |
+--------------------------------------------------------------------------------------------------------+
| files.damp-water-68304.pktriot.net   |               | 80     | true     | 443   | /data/files         |
+--------------------------------------------------------------------------------------------------------+
| blog.damp-water-68304.pktriot.net    |               | 80     | true     | 443   | /data/blog/public   |
+--------------------------------------------------------------------------------------------------------+
Conclusion
Docker makes it easy to pull down the latest version of the Packetriot client and quickly configure it. Because Docker includes flags like --restart that we can use during a container creation, we can ensure our tunnel is running 24/7. We also covered how you can easily upgrade to newer images and preserve your configuration and static sites you’re hosting.
As a bonus we demonstrated how to setup a static site using the popular generator Hugo. For more information and details that we skipped over, visit their website.
I hope this tutorial was helpful. Have any feedback or comments? Please tweet or DM on Twitter. Or just contact us via email.
Cheers!
The Packetriot team