HTTP Inspector
Published at August 18, 2020 · 8 min read
Share on:Using the HTTP Inspector built into the Packertriot client will make writing and debugging applications that integrate with webhooks much easier. You’re not limited to webhooks either, you can debug any HTTP-based application.
There’s lot of examples we could provide to illustrate how useful an HTTP inspector is during web development. In this post we’ll walk through creating a webhook for a GitHub repository so that we can receive notifications when changes are made to the repo.
In our example we simply log all of the events but in realistic scenarios you might want to use the webhook event to kick off some activity or send a response with some data to the client.
There are many services where webhooks are used extensively for interacting with their systems. Here are some popular examples: Intercom, Twilio, Slack Bots, GitLab, Atlassian BitBucket and many others.
Before we begin this tutorial be sure to have already configured a tunnel on your system. Download the latest version for your platform of choice here. And once you install or unpack the client you can configure it with this command:
pktriot configure
Using Google to sign into Packetriot? Add the --url flag to configure your tunnel.
We’ll be creating a GitHub repo for this example. If you’d like to follow along you can fork this repo or create you’re own. If you’re new webhooks we highly recommend just forking our example.
This blog is going to walk-through the following steps:
- Gather info about your tunnel to setup the webhook
- Setup the Webhook in a GitHub repo
- Verify GitHub is posting data to our tunnel and the Inspector
- Write a build small logging program to capture and print the webhook data
Let’s start!
Print info the Tunnel
After a tunnel is configured we need the assigned hostname for tunnel. Packetriot assigns a stable hostname to all tunnels. Run the command pktriot info to print out the hostname and other details about the tunnel.
[user@host ] pktriot info
Client:
	Hostname: flamboyant-mountain-86127.pktriot.net
	Server: us-east-65319.packetriot.net
	IPv4: 159.203.126.35
	IPv6: 2604:a880:800:a1::dd:c001
The hostname for our tunnel is flamboyant-mountain-86127.pktriot.net. This post is already becoming pretty epic :)
Currently the inspector only supports traffic to the hostname assigned to the tunnel but we will be working on changes to introduce support for reserved subdomains and custom domains in the near future.
Setup the Webhook
Click on the settings for the GitHub repo and then click on the Webhook settings. Then click Add webhook.
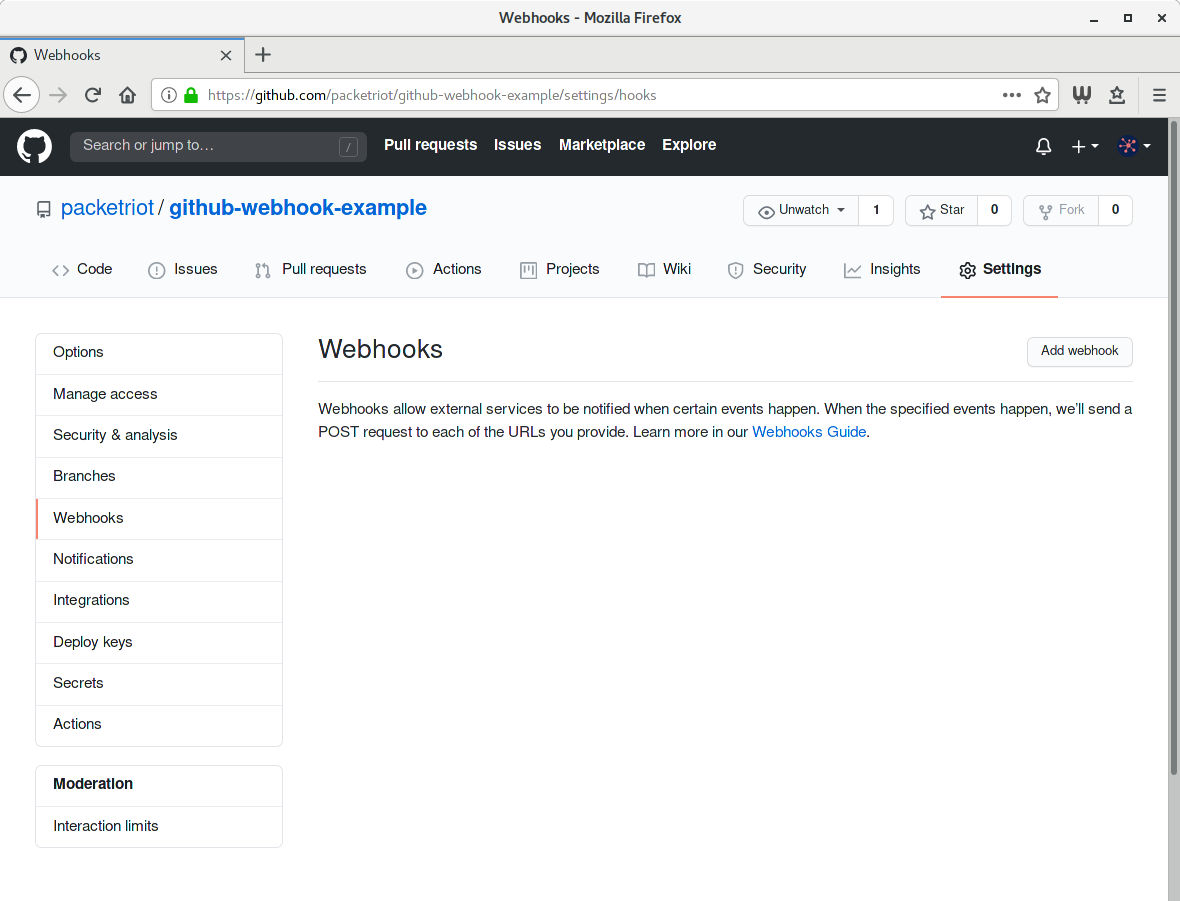
GitHub Webhook Settings
You’ll need to input the https address for your tunnel. We selected JSON formatted data. All tunnels support HTTPS traffic to the hostname it’s assigned so be sure to select HTTPS, it should be selected automatically for you. Also, we’re going to set a secret right away for our example. There are many libraries to help you perform the verification on GitHub’s webhook requests.
Check out this page for more info on using secrets. If you want to skip the secret and not set it for your example that’ll work fine too.
GitHub Webhook Settings
Once the web hook is added we’re ready to go. GitHub will attempt to POST a message to the webhook endpoint we just created. Since we’re not running the inspector yet it will fail and is expected. It’s time to setup our application. We can verify that our tunnel it receiving the webhook traffic before event writing any code, so let’s that.
Verify the Setup
Let’s run the inspector in the Packetriot client to verify that we are getting traffic from GitHub.
[user@host ] pktriot inspect 8000
Inspector is running: http://127.0.0.1:4000

Connecting to us-east-65319.packetriot.net...

Running HTTP services:
+---------------------------------------------------------------------------------------------------------------+
| Domain                                  | Destination   | HTTP   | TLS   | Secure   | Protect   | Site Root   |
+---------------------------------------------------------------------------------------------------------------+
| flamboyant-mountain-86127.pktriot.net   | 127.0.0.1     | 8080   | 0     | true     |           | --          |
+---------------------------------------------------------------------------------------------------------------+
Now we don’t have any application running or listening on port 8000 yet but our inspector will still receive the requests. Visit http://127.0.0.1:4000 in your browser to check out the inspector.
You can create a request by just updating a file in the repo. I live-edited the README.md in my example repo to generate the first event sent to the webhook.
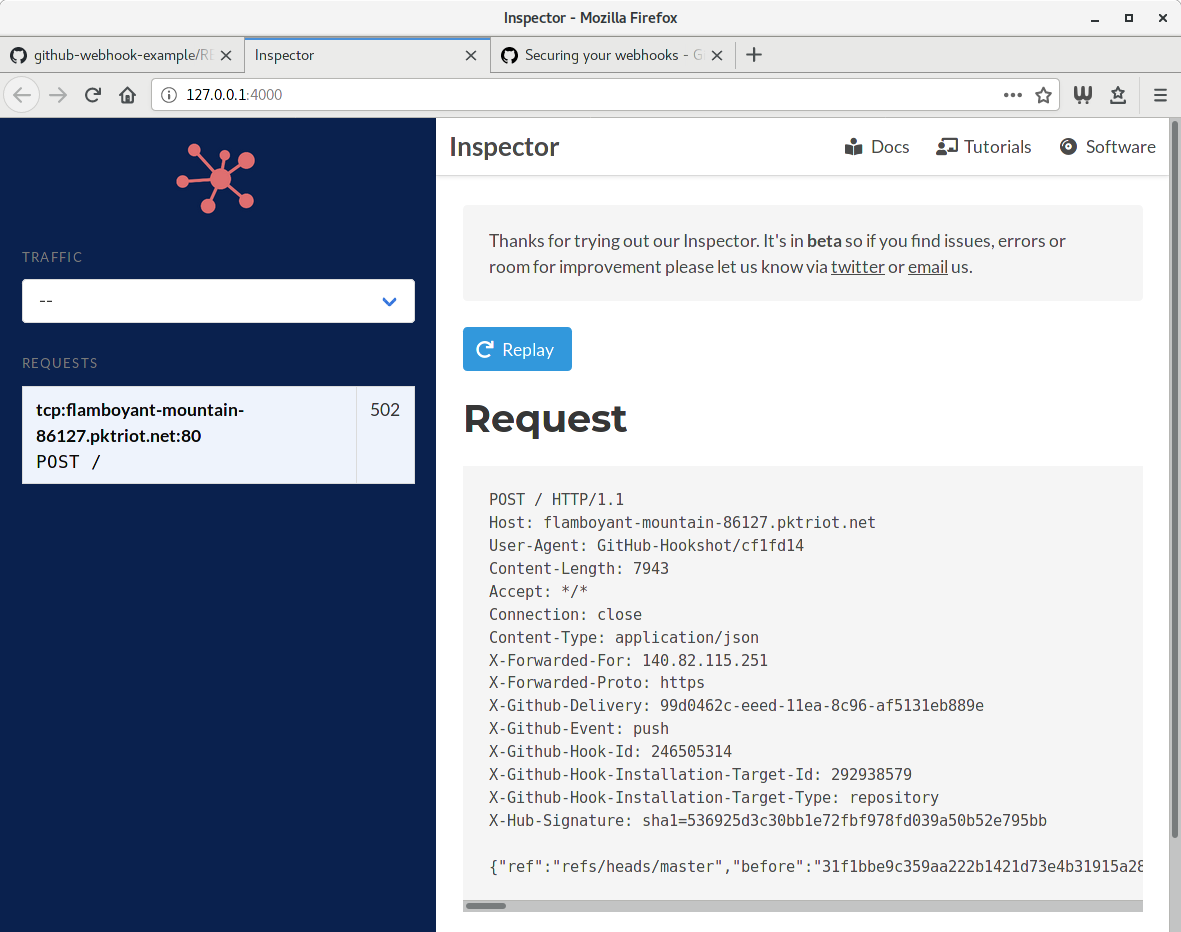
Test Event and Tunnel
You’ll notice that the HTTP status code for this request is 502 which means Bad Gateway. This means that the destination server is down which was expected. However, we know how our tunnel, inspector and webhook settings in GitHub are setup correctly so we can move forward with writing the code for our logging program.
Log Webhook Events
We’re going to use a simple program written in Go to receive and log our events. Please feel free to use any language you’re comfortable with. It’s a simple program but I’ll provide some comments and descriptions to explain what we’re doing.
package main

import (
	"bytes"
	"encoding/json"
	"fmt"
	"net/http"
	"time"

	"github.com/google/go-github/github"
)

var (
	secretKey = "asecretonlyiknow"
)

func printEvents(w http.ResponseWriter, r *http.Request) {
	body, err := github.ValidatePayload(r, []byte(secretKey))
	if err != nil {
		w.WriteHeader(http.StatusUnauthorized)
		return
	}
	defer r.Body.Close()

	// Print the event to console
	fmt.Printf("Event on %s:\n%s\n", time.Now().Format("Jan 2 15:04:05"),
		string(body))
}

func main() {
	http.HandleFunc("/", printEvents)
	http.ListenAndServe(":8000", nil)
}
Check out the example project we built for all of the file necessary to use and build this example. To build this code make sure you have Go installed and run go build in a freshly cloned repo. It’ll create a binary called main or main.exe if you’re on Windows.
This program creates an HTTP server that listens on port 8000. It will validate the incoming request with our GitHub secret and then print the contents to the terminal window.
Run the program from the example using ./main on Linux/Mac or main.exe on Windows. You’ll probably want to execute the program in one terminal (Unix shell, cmd, powershell, …) session and the inspector in another.
Run the inspector and direct the HTTP traffic to our program listening on port 8000
[user@host ] pktriot inspect 8000

Inspector is running: http://127.0.0.1:4000

Connecting to us-east-65319.packetriot.net...

Running HTTP services:
+---------------------------------------------------------------------------------------------------------------+
| Domain                                  | Destination   | HTTP   | TLS   | Secure   | Protect   | Site Root   |
+---------------------------------------------------------------------------------------------------------------+
| flamboyant-mountain-86127.pktriot.net   | 127.0.0.1     | 8000   | 0     | true     |           | --          |
+---------------------------------------------------------------------------------------------------------------+
You can create some arbitrary events by just modifying the README.md in the repo or making some actual commits.
[user@host ]./main
Event on Sep 4 17:01:22
{"ref":"refs/heads/master","before":"dd6b6655c2a4f871473e0343e7803dd10d570edc","after":"c5a306c84cd367c6b24720d25f660612800d164f","repository":{"id":292938579,"node_id":"MDEwOlJlcG9zaXRvcnkyOTI5Mzg1Nzk=","name":"github-webhook-example","full_name":"packetriot/github-webhook-example","private":false,"owner":{"name":"packetriot","email":"50630506+packetriot@users.noreply.github.com","login":"packetriot","id":50630506,"node_id":"MDQ6VXNlcjUwNjMwNTA2","avatar_url":"https://avatars1.githubusercontent.com/u/50630506?v=4","gravatar_id":"",
This JSON being printed to the screen isn’t easy to read at all. Let’s update and improve the HTTP request handler code to format and make the JSON output indented and easier to read.
func printEvents(w http.ResponseWriter, r *http.Request) {
	body, err := github.ValidatePayload(r, []byte(secretKey))
	if err != nil {
		w.WriteHeader(http.StatusUnauthorized)
		return
	}
	defer r.Body.Close()

	// Let's make the JSON we receive pretty...
	data := make(map[string]interface{})
	if err := json.Unmarshal(body, &data); err == nil {
		b := bytes.Buffer{}
		encoder := json.NewEncoder(&b)
		encoder.SetIndent("", "\t")
		if err = encoder.Encode(data); err == nil {
			// Override the body variable when no errors are present
			body = b.Bytes()
		} else {
			fmt.Println("Error: " + err.Error())
		}
	} else {
		fmt.Println("Error: " + err.Error())
	}

	// Print the event to console
	fmt.Printf("Event on %s:\n%s\n", time.Now().Format("Jan 2 15:04:05"),
		string(body))
}
Run go build again to update our binary with this feature improvement. Execute the program again and we can just replay a past request we received from GitHub. Make sure to run the latest version of the program we just built.
With the HTTP Inspector we don’t need to keep making arbitrary changes to test our small update to our code which will help make our development time more productive now.
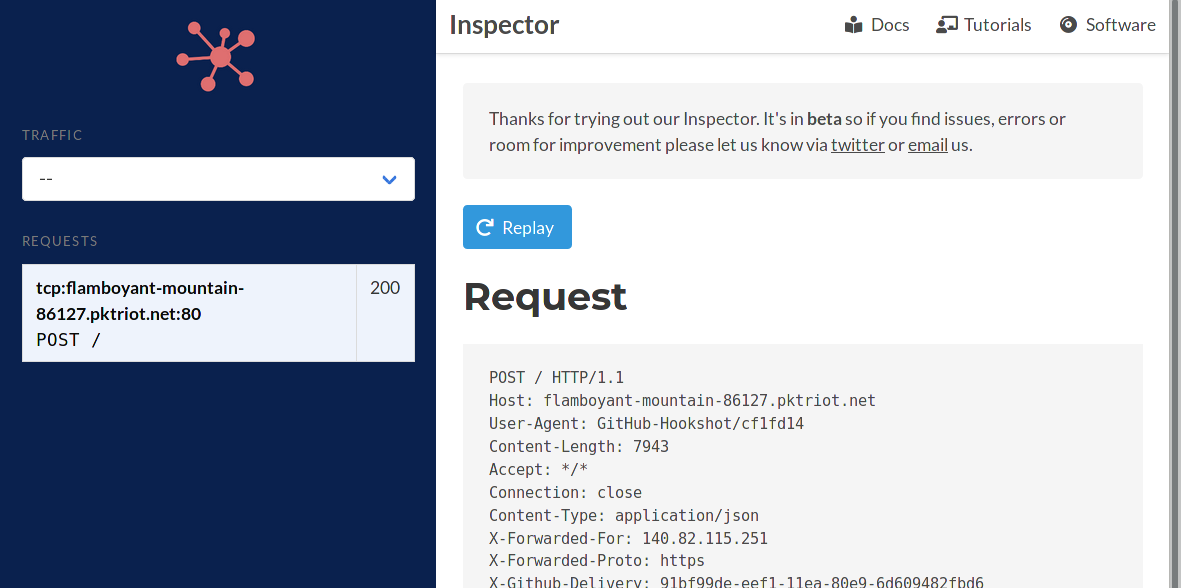
Replaying Requests
Select the request and click the Replay button. Now the output from our program is a lot more readable.
[user@host ]./main
Event on Sep 4 17:03:20:
{
	"after": "c5a306c84cd367c6b24720d25f660612800d164f",
	"base_ref": null,
	"before": "dd6b6655c2a4f871473e0343e7803dd10d570edc",
	"commits": [
		{
			"added": [],
			"author": {
				"email": "50630506+packetriot@users.noreply.github.com",
				"name": "packetriot",
				"username": "packetriot"
			},
			"committer": {
				"email": "noreply@github.com",
				"name": "GitHub",
				"username": "web-flow"
			},
			"distinct": true,
			"id": "c5a306c84cd367c6b24720d25f660612800d164f",
			"message": "Update README.md",
			"modified": [
				"README.md"
			],
			"removed": [],
			"timestamp": "2020-09-04T16:59:47-04:00",
			"tree_id": "4ef10db5e828b4cac4c867ab6be591c5e98e0305",
			"url": "https://github.com/packetriot/github-webhook-example/commit/c5a306c84cd367c6b24720d25f660612800d164f"
		}
	],
	"compare": "https://github.com/packetriot/github-webhook-example/compare/dd6b6655c2a4...c5a306c84cd3",
	"created": false,
	"deleted": false,
	"forced": false,
Conclusion
This was a pretty simple example. We manually stimulated GitHub to post an event to our event listener program but manual action is not productive at all, especially once you get to making small tweaks or tuning your program. Replaying past requests make’s it simple and more productive to implement and test your web applications.
The link to our repo is here.
We hope you enjoyed this tutorial. You can work similarly with other services that use webhooks like Twilio, Intercom, GitLab and so many others.
There are other use-cases that are more advanced and may require you to use more flags and options available in the our inspector. Please check our docs or run pktriot inspect --help for more information.
Have questions? Want us to cover a specific example? Reach out to us on Twitter or send us an email. If you enjoyed our article please share on social media. We have convenient sharing buttons at the top of this article.
Thanks for reading!